![]()
There's a lot to learn before you can fully understand setting access rights to files and directories for users and groups, so bare with me, whilst I explain. Because this topic is quite detailed and technical, I've tried to lighten it up by asking Pinky & Brains to join us ;)
Note
I'm no System Administrator, so to those who know better, my instructions may appear incomplete, incorrect or present security risks. If this is the case (which it probably is) then please mail me at feedback@thebits.co.uk.

- 1 -
Log-on as 'root'.
- 2 -
Enter:
cd /home- 3 -
Enter:
mkdir plans -m 770Note
When a directory is created it is allocated the default rights: 775. For this tutorial however, we need the rights for the directory to be 770. Don't panic about these figures appearing cryptic, all will be explained in due course.
- 4 -
Enter:
ls -l... and examine the line that reads:
drwxr-xr-x   2 root     root        1024 Jun  7 22:37 plans
rights         owner    group
Whenever a directory is created, it is allocated an owner and a group that it belongs to.
By default a directory is allocated the rights shown above (drwxr-xr-w), the owner is obviously the person that created the directory, and the group the directory is allocated to, is the owner's default group.
But What Does drwxr-xr-x Mean?
Examine the diagram shown below:
 Type  Owner Group Other
+-----+-----+-----+-----+
|  *  |* * *|* * *|* * *|
+-----+-----+-----+-----+
   d   r w x r w x r w x
   -   - - - - - - - - -
Here you can see that the rights for a file or directory indicates the following:
- Type (d = directory; - = file)
- Owner's rights (r = read permission given; w = write permission given; x = execute permission given; - = right not given)
- Group's rights
- Other's rights (i.e. everyone that is not a member of the group)
Now just to complicate matters, here's what each of the rights allows a user to do (or not do), dependant on whether it is a file or a directory in question:
          File             Directory
        +----------------+--------------------------------------------+
Read    | Look at a file | ls (list directory's contents)             |
        +----------------+--------------------------------------------+
Write   | Modify a file  | Create, move and delete files in directory |
        +----------------+--------------------------------------------+
Execute | Run a file     | To cd into i.e. move into                  |
        +----------------+--------------------------------------------+
- 1 -
Enter:
groupadd conquest- 2 -
Enter:
useradd pinky -g conquest...to add the new user 'pinky' (with the default group that he belongs, being the newly created 'conquest' group).
- 3 -
Enter:
useradd brains -g conquest- 4 -
Enter:
useradd enemyNote
Because the new user 'enemy' was not allocated to a group when created, a new group called 'enemy' is created and the user 'enemy' is allocated to that group.
- 5 -
Enter:
passwd pinky...then enter:
defcon...as the password (ignore the 'BAD PASSWORD' message), and re-enter the password.
- 6 -
Do the same for 'brains' and 'enemy', giving them the same password for convenience.
Note
The table below, shows who owns a file/directory when it is created e.g if 'pinky' created a file, the owner would be 'pinky' and the group owners would be 'conquest'.
  User     Owner    Group
+--------+--------+----------+
| pinky  | pinky  | conquest |
+--------+--------+----------+
| brains | brains | conquest |
+--------+--------+----------+
| enemy  | enemy  | enemy    |
+--------+--------+----------+
- 1 -
Press <Alt>+<F2> to switch to the second virtual terminal.
Note
There are a default of 6 virtual terminals for you to pick from (although a maximum of 12 can be setup). Virtual terminals are brilliant, in that they allow you to have multiple users logged onto the one computer. A feature I think you'll agree, that DOS is sorely lacking.
- 2 -
Enter:
cd .....and then:
ls- 3 -
Enter:
cd plans...Which will display the message 'bash: plans: Permission denied' since 'brains' does not have access to the 'plans' directory.- 4 -
Press <Alt>+<F1> to switch back to the first virtual terminal, where 'root' is logged onto, and enter:
chgrp conquest plans...to change the group that owns the directory 'plans', from group 'root' to group 'conquest'.
- 5 -
Now press <Alt>+<F2> to switch back to 'brains' and once again enter:
cd plansAs if by magic, 'brains' now has access to the directory 'plans' because he belongs to the group that own the directory!
- 6 -
Enter:
pico topsecret.txt- 7 -
Enter the following:
Pinky this is for your eyes only!

Tell nobody, that tonight we take over the world!
...and press <Ctrl>+<O>, then <Enter> to save the file, then press <Ctrl>+<X> to exit Pico.
- 1 -
Press <Alt>+<F3> to switch to the third virtual terminal, and log-on as 'pinky'.
- 2 -
Enter:
cd /home/plans- 3 -
Enter:
pico topsecret.txt...and add the line in bold to the text file:
Pinky this is for your eyes only!

Tell nobody, that tonight we take over the world!

Ok Brains!
- 4 -
Press <Ctrl>+<O>, then <Enter> to save the file. So why did Pico display the message:
[ Cannot open file for writing: Permission denied ]
Press <Alt>+<F2> to switch back to the second virtual terminal, where 'brains' is logged onto and enter:
ls -l...to display the following line:
Before
-rw-r--r-- 1 brains conquest 85 Jun 8 12:09 topsecret.txt2 things are wrong with the above access rights. Firstly 'pinky' needs write access so that he can modify 'topsecret.txt', and secondly should anyone else be allowed access to the 'plans' directory in the future, 'brains' still doesn't want anyone looking at 'topsecret.txt' (it is top secret after all ;) ). To fix these problems, simply issue the following command:
chmod 660 topsecret.txtAfter
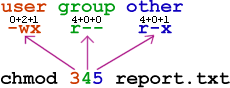
-rw-rw---- 1 brains conquest 85 Jun 8 12:09 topsecret.txtRather than spend ages explaining what that cryptic 660 represents, I thought it best to whip up a simple diagram. Those who are unable to understand this picture need to try and push their IQ into double figures ;)
Now press <Alt>+<F3> to switch back to 'pinky'. This time when you attempt to save the file, all goes as planned! Now that Pinky's work is finished you can exit Pico.
- 1 -
Press <Alt>+<F4> to switch to the fourth virtual terminal, and log-on as 'enemy'.
- 2 -
Enter:
cd /home/plans...to display the message:
bash: /home/plans: Permission denied...and Pinky & Brains breathe a sigh of relief ;)
Enter the following in the sequence displayed to return everything to the way it was before starting this section:
logout
<Alt>+<F3>
logout
<Alt>+<F2>
logout
<Alt>+<F1>

userdel pinky
userdel brains
userdel enemy

groupdel conquest

cd /home

rm -rf pinky
rm -rf brains
rm -rf enemy
rm -rf plans
By Laurence Hunter
laurence@thebits.co.uk
www.THEBITS.co.uk - updated daily...